Wednesday, July 21, 2010

Wednesday's Window

    I know you all thought I dropped off the face of the earth.  Well not exactly but summer has just been really busy.  I'd like to say I was off the radar on some tropical island sipping a frozen drink but that's not the case. While my boys were gone I thought I would get all kinds of projects done.  HUH not the case, it was crazy the first week I got caught up on some paperwork for my husbands business and the second week I was in panic mode trying to clean and catch up on laundry.  It wasn't all work and no play I did catch the new Sex In the City movie with an old dear friend.  Mom and I had a great day "junk" shopping,  I'll post my finds tomorrow, they made me very excited.  And my husband and I celebrated our Anniversary in Orlando for some much needed down time.  No Mickey Mouse but we did go to Joe's Crap Shack (which is an experience all in itself), a great dinner show (Sleuth Dinner Show) and went to the Outlet Mall.  Yes my husband acutally endured the day with me at the mall, he's a keeper.  It has been full steam ahead ever since the boys have been back.  We had our niece and two nephews come visit for a little while, which made six kids (five boys, two braindead teenagers, UHOY!)  Then we celebrated my middle son's tenth birthday which seemed to last a whole week.  Yestereday was the first day we just stayed home and had time to catch our breath. 

Well here is the Wednesday's Window you have been waiting for :

 My inpiration was a technique I saw on Make the Best of Things where she made a 3d effect with hot glue that really looked like old tin.  So I thought why not give it a try on a window?

I started with duplicating the lines of this cross that I had hung in my entry way. 

glued the stencils to cardboard cut to fit in each window pane.
 Then applied the hot glue along the lines that I had drawn out.  It takes some patience but overall I think the effect came out quite nice. 
I then spray painted them a metallic, stainless steele color ( same paint I used on the dresser hardware), and topped with a coat of that celery green latex paint I used on the first window project. 

I have a dear friend that collects crosses so this one is for you Sherri! I love you girl cant wait to see you. :)


Linking up to the last Bragfest at :(

button


Praise God for YOU!!!
Read more: http://www.mylivesignature.com/wizard3_2.php##ixzz0miIcUbIS

Friday, June 11, 2010

Dresser Hardware Upcycle

Ok I had one of those "DUH!" moments.  I have been slowly redecorating my bedroom, or should I say finally getting around to doing something in our room for a change.  It seems I have decorated every other room in the house but our bedroom always came up last.  So one weekend while my husband went on a fishing trip I thought I would surprise him with painting the bedroom, and changing it around a bit.  Well I bit off way more than I could chew.  But its coming along, I'll be posting more about that later. 

Anyhow my "DUH!" moment happened when I painted our dressers.  Originally they were stained but with the wood floor it clashed in color.  Besides I painted the walls a Tiffany blue and the stained oak color just didn't do it for me.  So I thought I would paint them black, oh my gosh they look fabulous.  The problem was with the hardware, they had black hardware on them.  So I thought I would go buy more modern hardware, in a stainless or those really cute glass knobs.  Problem being that they cost a fortune and I'm just too cheap to spend that much on new knobs.  Sooooo it dawned on me one day, HELLO spray paint them!  After all I liked the shape of the old hardware so why not? 

This was them before, perfecty fine hardware just not on a black dresser.

First I put on a coat of Rust-Oleum Hammered spray paint in a stainless/silver color.
Then I applied an acrylic black, and rubbed it off before it dried so it was just left in the creveses.  Then a top coat of clear sealer.  Voila!!

Check it out, what do you think?  I saved approx. $100 for both dressers.  Pretty proud of myself :)


Praise God for YOU!!!
Read more: http://www.mylivesignature.com/wizard3_2.php##ixzz0miIcUbIS

Wednesday, June 9, 2010

Wednesday's Window

Well here it is.  It's not perfect probably needs some paint and maybe some trim.  But I'm pretty proud of how it turned out.  I'll have to get that handsome carpenter guy I live with to help me out with that.  hehe.  He loves when I come up with new projects for him to do.  NOT!  When we were getting the hinges I was eye balling some old doors I want to use for another project.  He was quite as excited as I was. 
It is four six paned windows on the bottom hinged together by old door hinges. 


the top is two four paned windows hinged up so they meet at the center a form a peak.  I tried to clean them but apparently they still need a good wiping. 


Don't you just love hydrangeas?  I have finally got some to bloom this year.  They grow beatifully all over Tallahassee but just not where we live.  As you can see from the picture above we have very sandy soil, the rest of Tallahassee has that beautiful red clay that holds lots of nutrients. 


This poor little plant bllow has a sweet story.  I planted two hydrangeas some years ago and each year I get a few leaves and nothing else.  This past year we had a lot of frost and I thought I lost them for good this time.  One came back just fine (still no blossoms though) and the other was just sticks.  I dug it up and thought it was going to be hopeless, but I noticed a little bit of green on one of those sticks, I thought there must be life left in this poor thing after all.  I stuck it in an old pot I had sitting around and put some dirt in it, gave it some water and within a week leaves started to sprout.  I will have to admit the blossoms are from a new plant I bought this year.  I cut a couple off the other plant and stuck them in this one for photo purposes. 

I can't wait to put that coat of paint on it and bring it in the house.  I have a perfect spot for it, right next to my computer so I can admire it every time I'm talking with my blog friends. 


      Photobucket  
Punkin Seed Productions


Creations by Kara


Praise God for YOU!!!
Read more: http://www.mylivesignature.com/wizard3_2.php##ixzz0miIcUbIS

Monday, June 7, 2010

House Keeping

   Here's a little run down of what's going on in the Wood household these days.


  The next few weeks I am going to be tweeking with a few things to make my blog a little better.  I am learning so much from fellow bloggers.  Praise God there are so many of you willing to share your knowledge.  Some things are so easy to change and others are a bit complicated, but in all most people can do it if you just have some confidence and are willing to put the time into it.  Right now I'm working on a new header, there is a great post on it using Picassa over at Clover Lane.  Now I'm just trying to get the right pictures use.  So if you stop by and think your in the wrong place just look again there have just been some changes made. 


    The first day of summer break is here, with three boys at home (one being 13) my cupboards are already bare and I've already heard "I'm bored, what are we doing today?" "What are we doing tomorrow?"  "Are we going to do anything this summer?"  But between entertaining I should be able to get some work done.  I'm thinking of teaching one of them how to use the computer and do some filing, ha.  As Bill Cosby said "there is no such thing as a democracy in this house"  lol  Maybe they won't be so bored if I put them to work, he he.  No seriously I can't complain too much, they are going to leave for three weeks this summer to visit my husband's family in southern FL.  I really don't know what I'm going to do with myself, I'm going to miss them.  I'm relying on my new blogger friends to keep me company, hehe.  I promise not to stalk you... well not too much anyway. 


    Don't forget about Wednesday's Window this week.  We've been working hard on getting it ready for you.  I saw this idea at a local salvage shop and thought oooh I got to have one.  I'll give you a small hint, it combines two loves of mine, old windows and gardening.  I know you just can't wait.  Don't forget I'm always looking for new ideas for repurposing old windows.  If you have an old window you've repurposed I would love to feature you.  Just email me, or leave a comment. 
    
    Well I better feed the natives before they start to eat me.  One good thing about summer is the lack of schedule, whoo hooo!!


Praise God for YOU!!!
Read more: http://www.mylivesignature.com/wizard3_2.php##ixzz0miIcUbIS

Wednesday, June 2, 2010

Wednesday's Window

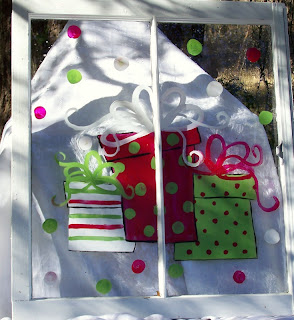
It's that time again.  I don't have my newest project completed so I thought I would show you an old one.  After of course scouring down each window with bleach, these I put a coat of semi-gloss exterior paint.  I then went to town with Delta Perm-Enamel glass paint.  This paint does not have to be dried in an oven or kiln and clean up with water.  The only prep is to clean the glass with alchohol before painting. 


Thought this would be cute for a little princess room.


 My Mom is in love with roosters so this was for her but it someone else loved roosters just as much and I ended up selling it.  Sorry Mom


and I thought these were just too cute to hang for Christmas decoarations. 


Enjoy your week, hope to see you back again next Wednesday.  Its our last week of school around here so it is kind of hectic.  As always just email me if you would be interested in sharing your widonw redo ideas. 


Praise God for YOU!!!
Read more: http://www.mylivesignature.com/wizard3_2.php##ixzz0miIcUbIS

Wednesday, May 26, 2010

Wednesday's Window


     Every Wednesday is Wednesday's Window,  I will be featuring a new way to repurpose old windows.  I have seen so many great ideas out there.  I also have an abundance of windows, as I will explain in a minute. 
    So it all started some years ago when I saw an old wooden window that someone had taken these gorgeous black and white pictures iof thier children and put them in each of the panes.  So I came home and searched and searched for a window and finally found one, purchased it and its still sitting waiting for me to add the pictures.  Sigh...  In the meantime, my husand, the carpenter, installed some new windows for someone bringing home a huge load, or at least what I thought was a huge load at the time of old windows from an old plantation home.  We made all sorts of things out of them which I will show in later weeks.  Then another window job came in and another and another each time bringing home more and more windows.  The reason for the abundance of windows.  I've had all these dreams and hopes of what to do with them but lacked motivation, and quite overwhelmed with the quantity.  So I thought by featuring a new idea each week will motivate me to get something done with them.  We are also selling them as is if anyone is interested.

So this week I am featuring the bulletin board you see above.  For this project I started with a six pane window, the glass had broken on half of the panes already so it looked good to use for this. 
At first I just cut and put into place the cork board tiles ( found at Michaels, Walmart, etc), but that was waaay too plain, it needed some personality, also the cork board itself was just too thin, it needed some meat behind it.  So I thought I would stencil a design on there.  Don't you hate it when you have the idea of what you want in your head, you know you have seen it somewhere but can't find it?  Well that was me, I had this image of vines, leaves, flowers dancing around in my head.  I searched the internet for clipart, I searched fabric suppliers for a fabric swatch I could use for a design, I searched scrapbook papers, even bedding and could not find what was in my head.  So after drivng myself almost completely crazy I was walking through my sewing room and caught one of my clear stamps out of the corner of my eye.  That's it that will be perfect to make a stencil.

I found my ink pad and stamped it on a piece of paper, then blew it up on the printer, it took a few tries to get the right size.  Finally I was happy with the size and stuck some clear contact paper on top of the design. 

Then painstakingly cut around the image with an exacto knife to make my stencil. 
Placed the positive image (the piece you cut out) onto the cork board and painted all the tiles with celery green paint. 

Once the contact paper was removed, this is how it came out, not too good.  The image wasn't clear and it still needed more personality.  So back to the drawing board, I blew up the image one more time, it needed to be more bold to show up.  Cut it out again and placed the negative image on the tiles this time.  I needed a color to show up on the green, at first I was going to use white but my husband thought that was too boring and since I have been added little bits of red to my kitchen I thought red would be perfect. 

Here is a very blurry picture of the tiles before I put them in the window
I cut pieces of foam core to place behind the tiles to give them more meat, you could always use some sturdy cardboard also but I had an unused piece of foam core so I used that.  Taped them all into place and
Voila!!!
Here's the finished product.  I love that its the right mix of retro and modern.  I left the window frame as it to leave that old worn character. 

Photobucket                The Girl Creative
Visit thecsiproject.com


Praise God for YOU!!!
Read more: http://www.mylivesignature.com/wizard3_2.php##ixzz0miIcUbIS

Tuesday, May 25, 2010

What's for Dinner?

What's for dinner at your house tonight?  We're having country style ribs with homemade bbq sauce, mashed potatoes, corn on the cob and corn bread.  Sounds good don't it?  I thought I would share a recipe I learned from my husbands oldest brother, the fireman.  Fireman are the best cooks, hands down.   This one is easy as can be. 
Easy as can be Cornbread Recipe
1 box of Jiffy corn muffin mix
1 egg
7oz can of cream corn
( the small size is hard to find and is more expensive so I get a whole can and freeze the rest for later)
That's it!
Mix together, bake according to cornmuffin mix directions, can be made into bread or muffins whichever you feel like making. 


MMMM...mmmm!!!! I just taste tested the ribs, boy they are good.  I'll have to give you the recipe for the bbq sauce some day. 


Praise God for YOU!!!
Read more: http://www.mylivesignature.com/wizard3_2.php##ixzz0miIcUbIS